Geluidsisolatie Huis Studio / Thuis Theater
Gezien de hoge geluidsniveaus die tegenwoordig geproduceerd kunnen worden met de thuis theater geluidssystemen is geluidsisolatie naar de rest van het huis zeker iets dat serieus overwogen moet worden. Akoestische isolatie moet besloten voordat met de bouw van een woning of appartement wordt gestart.
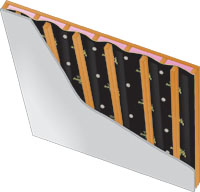
Acoustiblok®wordt veelvuldig gebruikt om het geluid tegen te gaan in thuis theater toepassingen. Installatie gemak is één van de factoren die bijdraagt tot het gebruik ervan. Het installeren van Acoustiblok ® op muren, vloeren en plafonds zorgt voor een effectieve vermindering van de geluidsoverdracht. Bij de subwoofer en de in-wall speakers moeten de mechanische verbinding met de vloer / meubilair / tapeinden worden verminderd met isolatie pads of kurk en Acoustiblok ®. Het toevoegen van veerkrachtige materialen en een hole spouwruimte i.c.m. Acoustiblok ® zal de geluidsisolatie doen toenemen. Een veerregel bijvoorbeeld ontkoppelt de gipsplaten van de basis constructie en creëert een luchtspouw tussen de gipsplaten en de Acoustiblok ®. De luchtspouw helpt om het geluidsdrukniveau verder te dempen.
Een ander voordeel van van Acoustiblok ® is de verbeterde definitie van de basweergave in de luisterkamer. Dit is grotendeels te wijten aan de demping en enigszins stijve kenmerken van Acoustiblok ® die zijn toegevoegd aan alle behandelde oppervlakken, wat resulteert in een duidelijkere en strakkere basweergave.
We had a custom home theater in Parker, Colorado that wanted to make sure their surround sound system in their new home theater was sound proofed. After much researching, we found Acoustiblok. Working with Acoustiblok was pretty easy. Acoustiblok worked perfectly because it stopped the speaker noise from traveling to other room without taking up any space. The most entertaining part of the job however, was the customer’s children. They had a couple of teenagers who would run in the room each day screaming. My guess is that they wanted to check the progress as we installed. Over all Acoustiblok was easy to use and definitely got the job done.
Thanks Acoustiblok,
Kirk Thompson, Advantage Alarm & Audio
Aurora, CO

Acoustiblok Acoustical Insulation
Reviewed by: Joe Hageman
Joe is the VP of Caster Communications and has written for a variety of home entertainment publications.
The great thing about building a home from the ground up is that you get to have things the way you want them.
One good decision you can make, especially when constructing a media room or a dedicated home theater, is acoustical treatments. Not the kind you hang on the walls, but in the walls. See, sound transmission from room to room is a big problem for any home that has a killer entertainment system. Neighboring rooms have to endure the bad dialogue or action at the same time persons in the media room are enduring or enjoying it, since that pink stuff in the walls does nothing to stop sound from leaking into adjacent rooms. Acoustiblok addresses this very problem.
Installation Issues
Be forewarned; This stuff is heavy! We received three huge rolls of Acoustiblok to cover the media room walls and floor, and take it from us-it’s not a one-man job. Secondly, we didn’t receive enough. If you’re thinking of ordering some Acoustiblok, do yourself a favor and order about 100 square feet more than you think you need.
For the best results, it is recommended by the manufacturer that Acoustiblok be installed between the studs of a “staggered stud” wall. We didn’t really plan this part out ahead of time, since the standard walls were already up. We started by cutting off a manageable sheet of Acoustiblok (if it is possible to use a continuous sheet, that is preferable, as you won’t have to tape as many seams) and nailing it to the studs using a nail gun and tin roof caps. The roof caps prevent the nail from going straight through the Acoustiblok and help form a seal around the hole you just made with the nail.
Performance/Features
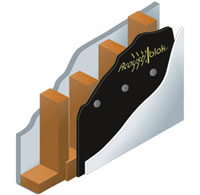
Acoustiblok is a sound isolation/blocking dense material (feels looks like heavy vinyl). Its purpose is to stop sound from leaking through the walls, and according to the manufacturer, it reduces sound transmission by 26 dB.
Did it work? Well, we can definitely say that even with a DVD going in the media room, the guest bedroom is relatively quiet. Had we completely encased the room or installed a staggered stud wall, it would have been dead quiet, according to the manufacturer.
Another great benefit of Acoustiblok is that it isolates the sound in the room you’re in, thereby dramatically improving bass response. Bass can be tricky; it’s low frequencies are non-directional and tend to find their way through any tiny little hole and into the next room, and every little bit of bass that escapes the room is less bass that you’re hearing and feeling.
The Last Word
We enthusiastically recommend Acoustiblok to anyone building or remodeling their house-and not just for the media room. Just be sure to call an installer or at least plan to have a helping hand nearby.

THE PILOT PROJECT
Each month we follow Capt. Chris Dotur, a U.S. Air Force airlift pilot, on his journey of designing and installing a home theater. We have no idea how long this will take or what the end result will be! This series will end when Capt. Dotur sits down to view his first DVD in his new home theater.
This month’s article is a little different, as I’m writing it from 32,000 feet somewhere off the Middle East. We left a tense area a little while ago, and I’m taking my turn out of the pilot seat as we relax for a long flight ahead. As I usually do at times like these, I’m feeling very appreciated about many things in my life.
Ironically, just one more little thing to be appreciative of this month is actually an unexpected delay in my theater project. I thought I would be putting up drywall this month, but instead I got involved with a company called Acoustiblok (that’s right, there’s no “c” – yes, we military boys do know how to spell). The company makes a product by the same name that is primarily used for sound deadening in theater and building walls. It can also be wrapped around pipes, installed in vehicles or even used in boats.
The people at Acoustiblok were very friendly and easy to work with.They describe their product as sheets of “loaded vinyl.” Possibly even better than putting a layer of lead in your walls. It absorbs sound energy with compressed mass while remaining flexible. It is most effective in middle range frequencies. As I am always looking for a way to keep my loud music and movies in my theater and not bleeding out to the rest of the house, I was happy to see a rating of 26 S.T.C reduction. this is a minimum if properly installed. Time and time again the Acoustiblok people told me, “just be aware that it is very, very heavy” That sentence should be repeated with as many “heavies” as a single breath allows.
How heavy? Well, how does 1lb/sq ft grab you? For me, that meant seven large rolls of Acoustiblok had a delivery of over 2,100 pounds – more than 300 pounds per roll! I can’t emphasize enough how heavy these rolls were. I needed help from several neighbors and a dolly just to get it in the theater room. I’m not so sure my neighbors will ever want to help me out again. Every time I come back from a break from this project those rolls looked deceptively east to move. but just one attempt to lift or push a roll proved otherwise. All the lifting is worth the end result.
Although Acoustiblok can work as rigid material, such as pressed between two layers of sheet rock, it works best when remaining “limp” to absorb sound energy. Therefore, the best installation solution for me was to tack the Acoustiblok to my wall studs before putting up my drywall, leaving excess material between the studs rather than pulling it tight, On some walls, I hadn’t finished building a second staggered stud wall (part five of this project) and this was a blessing. By putting up the material first, it meant that when I built the second staggered stud wall later, the Acoustiblok would be woven in between studs for maximum effectiveness. This did require extra slack between studs. In places where I already had both walls erected, I simply tacked it to the inner wall.
Installing the Acoustiblok is a straightforward process, and the company has even posted easy to follow instructions on their web site. To prepare the sheets for installation, I had to unroll a bit and lay it flat on the floor. Using a T-square, I straightened off the edge so that it would mount flush with a perpendicular sidewall. Here, I discovered that if you’re not lifting or moving the Acoustiblok sheets, they are actually very easy to work with. After scoring the sheet with a razor blade, it bends and tears apart easily.
I started at a wall corner, placing the squared-off sheet edge flush against the adjoining wall. It was easiest to keep the roll standing on edge, a few feet away from where I was working so that the top edge of the material didn’t droop to the ground and constantly have to be held up in place. Acoustiblok installers recommend using washer or tin roofing washer caps behind nails, screws, or staples to attach the sheets to walls. This keeps the material in place more securely by dispersing weight and guards against tearing when the material is punctured. I chose to use the roofing discs behind nails, which worked just fine. I spaced them five across each sheet.
The rolls come in 54″ widths, meaning that I had to use two sheets side by side to cover the height of each wall. Doing the bottom row was cumbersome because the need to slide the heavy rolls, but it was straightforward. Most of the time I was even able to do it myself. The top row was much more difficult! Lifting the sheets into place required the help of a friend. To prevent gaps in the material I tried to line up the edges of two sheets as exactly as possible. Overlapping is okay as long as it’s not on the face of a stud to which drywall will be attached. Anything sticking out from the rest of the face would make the drywall bulge out at that spot, so the same principal applies to nail heads and washers as well.
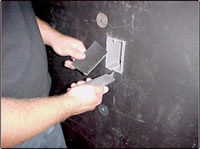
After all the walls were covered, I went back and cut out each electrical box that I had installed in part 6 of this project. There were many. Again, after scoring around each box edge and masking an initial cut with a razor blade, the material tore easily. I kept it as tight as possible around the boxes to guard against material gaps.
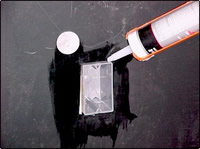
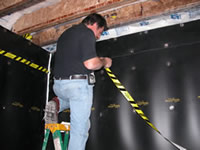
Sound rooms, like theaters, retain sound best when they are “sealed watertight like an aquarium.” You may have heard this saying before. Leaving gaps and holds inside walls, floors, or ceilings allows sound to escape. This obviously decreases the “performance” of all the special products you installed. Therefore, I had to go back and seal all the seams. Acoustiblok recommends various types of sealants on their web site, and I chose a silicone acoustical caulk. Their gurus recommend using the caulk in conjunction with tape to seal seams. The tape they sent me was a riot. It had black and yellow stripes with the Acoustiblok moniker stamped in large print. After taping seams all around the room, I stepped back, and for a brief second thought, “You know, I could just leave the room like this and go for a groovy construction theme in the theater.” Okay, maybe not.
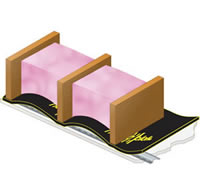
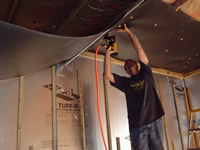
Between the floor matting and the Acoustiblok the room already has more of the “dead” feel to it with sound. It’s great! Adding carpet, drywall, and fabric will make it even better. I did save one roll of material for the ceiling. The homebuilder had to put up one layer of drywall on the ceiling to hold the attic insulation before he could sell the house to me, so i couldn’t put the material before the drywall. Talking over my options with the Acoustiblok experts, we decided that, in my case, instead of trying to sandwich it between a second layer of drywall, it would probably be more effective for me to lay it on top of the rafters. This would prevent sound from traveling into my attic and echoing. I have more work to do with the ceiling but I’ll do it later, when my attic isn’t a sauna.